The Elements of Art: Definition, Activities and Worksheets
- Emily RN
- Dec 15, 2024
- 9 min read
If you're an artist, a teacher or involved in any way with art, you will have come across these elements that help us discuss and create art. These elements are: line, shape, texture, color, form, value, and space. I must add that even though it is not normally added to the list I loved to start my year of lessons using dots as the beginning of the art elements and will be adding it to my list as well. These lessons will be focused on elementary school learning but will most likely make another post about more advance lessons later.
Dots
Dots are the start of any artwork, a line is a moving dot. With dots you can color, shade, add texture, and more. You can be very creative with dots and there are a few artists that can be mentioned who are very well known for their dots. For one, there is Georges Seurat and Paul Signac who are known to be the fathers of pointillism, an art movement that started in the 1800s after the impressionist movement. Pointillism is technique in which images are formed with dots.
Another more contemporary artist I brought to my classroom was Yayoi Kusama. There are a few great videos about her, my favorite probably being this one: Becoming an Artist: Yayoi Kusama I Tate Kids. She uses dots on paintings, sculptures, mosaic, rooms and fashion. Dots themselves can be main object or dominant component of an artwork and that's why I consider it to be one of the art elements.
Dot Activities:
Fingerpainting. Or use a brush to create a figure or to color inside a printed picture using only dots.
Clothe painting. (If you have students that can bring old clothes or if you can find funding for white t-shirts) Use paint to make dots on clothes to be worn another day. They can express their personalities or how they feel with the colors they choose.
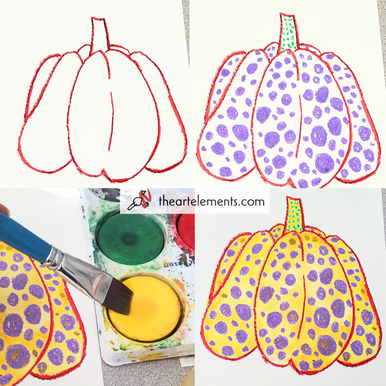
Oil Pastel Yayoi Kusama. After discussing Yayoi Kusama's art: Use oil pastels to draw fruit or vegetables and dots inside of them, later paint the whole page inside and out with watercolor of tempera cakes. My students loved this one and the results with the second graders were great.
Lines
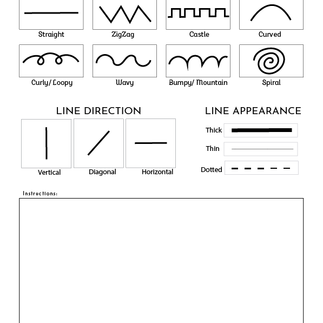
Lines helps us create a lot of the other elements such as shapes, forms and texture. You can create objects, people and places with lines. You can use lines as guides or lines to divide the space you work on. You can create thick or thin lines, short or long, intersecting or parallel. You can use lines to draw contour, one-line drawing,
There are so many creative works you can do with lines, here are some suggestions:
Line Activities:
Piet Mondrian with paper. Use black construction paper to cut black strips. Use these to create a Piet Mondrian inspired work. Glue the strips vertically and horizontally on a white construction paper and have students paint inside the created squares with primary colors. I used this one in my classroom to practice cutting motor skills.
Gene David with paint. Talk about Gene David's work and have students practice making straight lines using the ruler and painting inside the line. For smaller kids you have papers printed and/or they can color with crayons. [alternatives: Use painters tape, use paper on top to cover up sections to paint]
A hairy creature. Have students make a creature or have a printable and have them draw lines to create hair on top. It could be with pencil, crayons or even small paint brushes.
Shapes
Shapes are enclosed lines that can be described as two dimensional or 2D. Shapes can be categorized as organic or natural shapes and geometric shapes. There are a lot of different activities to learn each of these categories. We have some worksheets for little ones to learn about the geometric shapes, which are the most taught. For organic shapes we can think of leaves, fruits or animals, paint splatters or random shapes cut out of paper.
Shape Activities:
Geometric shapes book. Besides using worksheets to practice them, a shape book with construction paper is my favorite idea. Students can practice cutting, gluing and writing to make the book. They can make things with the shapes in between or at the end like a house, a rocket ship or a robot, they usually love those.
Organic shapes. Painting rather than cutting paper is a lot easier because it's more fluid. For my second graders we talked about nature and I had them draw and then paint anything that they loved that was from nature. It could be an animal, a place or even people. The rule was that it couldn't have any geometric shapes. Many of them made trees and animals. For my class last year, we were a little behind on time so I mixed the colors subject with this one and I had them choose between primary colors or secondary colors only to paint their drawing and it came out pretty good.
Pizza Construction Paper. Recommended for K and 1st grade. Discuss the shapes and cut each shape step by step. The dough starts with a big circle but it's cut into triangles that each student gets. Students cut little red circles for pepperonis and little yellow rectangles for cheese. If the students want to add another ingredient, they must pick a shape that was discussed. They should be able to describe their pizza using the vocabulary.
Texture
Texture is the appearance of a surface. In visual arts it can be a 3D surface with a feel or a flat surface with elements that add a feel that can be perceived by eyesight. For example, in actual texture there are rough, bumpy, spiky and smooth surfaces and there are smooth surfaces that have a spiky surface drawn like a cactus. You can not feel the thorns with your hand but you can see the texture with your eyes. This is known as implied texture. It's a lot easier to make projects with implied texture because actual texture requires more materials but if you have just paper you can do a lot.
Texture Activities:
Texture monster. This one is my favorite activity and I did it every year with my K to 2nd grade groups. As the title implies, students will make a monster, the monster must be made out of shapes that can be filled in. For the little one I would have them choose geometric shapes and draw them big. We would practice different types of visual textures with a worksheet beforehand and then use it to cover the monster in 1 to 3 different textures. You can tell your students how a chicken has different textures, its beak, legs and feathers are all different textures. (PS. Making a monster was not my original idea, I believe I got it from somewhere on the internet, you may also call it "creature" instead)
Implied and Actual texture board. I don't think this one needs much explanation but I had my students divide a paper in half (you can use poster paper or add construction paper on the back for a more stable surface). Have various small objects with different textures that the students can glue: cotton, fabric, sea shells, pasta, sand...etc. Make sure to leave some space to write the type of texture each item is: soft, rough, bumpy, etc. On the other side students should create a visual texture that shows that same type of texture: soft? how do I draw something that is soft?. Maybe I can make dots to make a texture like sand. That's an example you can use.
Color
Light bounces or reflects off and object and we perceive that as color. I think it's hard for little kids to understand this concept but I still teach it, and a simplification of how the rainbow works is the best way to start. I always tell them that when the lights are off the colors don't exist and if you can dim the lights you can show them to observe how objects can look darker or greyer. Color theory is a huge subject: primary, secondary, tertiary, complementary, analogue, warm, cool and there are more. The easiest way for me to implement these in my K to 6 was to teach them in different grade levels and to mix them with other subjects.
Color Activities:
Choose Primary & Secondary - Once primary and secondary are discussed, choose one group to create. This can be applied to any theme, nature, robots, food, animals, a city. There is a standard that talks about nature so that was the theme I used, where students were stuck with only three colors and had to make decisions on where to put these colors after they made a drawing that had objects from nature.
Complementary - The most simple activity I did for this one was fold the paper and repeat the a shape (or drawing), choose two complementary colors and paint using only those on one side and invert it on the other.
Value
Value is the lightness and darkness of a color. I made value ice cream scoops on a cone, gradient skies, and value cities with my students. It's very easy to transition from the color subject to value or even explain it with form. For smaller students I prefer to use construction paper or use something more concrete (separating the colors by shapes) and for older students I would demonstrate and hand them a worksheet on how to create a gradient on one space, like a sky or shading.
Value Activities:
Gradient Painting - With a good watercolor paper students from 3rd and up can be taught how to make a great gradient using watercolor and water. Make a gradient sunset sky or try making a frangipani flower with a gradient watercolor technique.
Gradient Construction Paper - Find various shades or tints of a color or students can paint white construction paper or cardstock paper with a mix of white + color, just color and black + color on 3 different papers so that they can later use to cut. They can make mountains that are further away, a gradient ice cream scoops or a stack of cups that are in order from light to dark or dark to light.
Form
Forms are 3D shapes that have length, width and depth. There forms that are real and forms that are implied. Real 3D forms are the ones we see in sculptures or objects that we can walk around a 3D form and see all it's sides, touch it and feel it's taking up space and has texture. While an implied form is the one we can only perceive visually for example in paintings, pictures or drawings. By adding shadow and light and perspective techniques, an artist can achieve 3D forms in a 2D surface such as a paper or canvas.
For form activities I tend to make an implied drawing introduction but it's more fun to leave the bigger projects for real forms.

Form Activities:
3D Paper Board - Each student gets a piece of cardboard to glue paper on. With various construction paper available teach students various ways to make a paper that normally looks flat to elevate and take up space: make a rainbow with arched strips, fold, curl, cut and glue stacks, roll, spiral cut, paper knit. Teach various techniques and have students choose a few to recreate and have them create a way not taught to make a paper pop out.
Airdry Clay or Paper maché- It is messy but it's quite fun. In second grade I'd have students learn techniques for clay and create a mug using their preferred technique. In 4th grade I'd have the students design an ornament using playdough first. It's important to repeat the vocabulary and have students describe their work using it.
What type of form did they make and what dimensions does it have? What material did they use?
Space
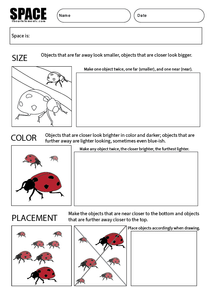
Space is a broad subject. For elementary school there is a lot you can do but it depends on the grade. To start all my lessons on space I have my students answer "What is space?" It's a great question because they usually know about space around them or they talk about the outer space and we can relate it back to the space of a paper. Space in art is the area used and not used to create something. The way space can be used, for example a drawing on a paper, can create the illusion of depth by using size, color and placement. I created worksheets for my students to practice different versions of this. I have a worksheet for an introduction of this subject.
Space Activities:
Perspective City - The most basic but best introduction, I believe, for the use of space and perspective is to make a tall building city. To make this simple city, make at least 3 layers of buildings so that value can be applied. I had my 4th grade students make the city however they wanted, add signs, make houses or businesses, but using the principles taught in the space worksheet. While 2nd and 3rd grade was divided in three specific sections: foreground was a bridge, middle ground were houses or buildings, and background were mountains and sky. This way was more simple to understand for the smaller ones. I leave all the technicality of vanishing points, horizon line and guidelines to 5th grade and above.
Giant Toy - To get even more creative with space is to have kids make a toy look ginormous by making other objects that are actually big, but small right next to them. My favorite example of this is "Curiosity" by Jeff Jordan where he demonstrates an amazing example of the use of scale by changing the size of a yellow baby chick the size of what seems a 3 story house next to a man who looks small in comparison.


